Showing posts with label Cooking. Show all posts

October 16, 2007

Cheap/Tasty: Penne Alla Awesome


"Oh. Heavy cream? Skip, is there anything I can substitute?"

"No. Absolutely not. Please Robin, don't substitute anything for the heavy cream. We're talking 1 tablespoon (per serving). Please. Just have a little less and eat a salad."

This story started last week when I didn't feel like making dinner. I'm still settling into Birmingham, and cooking sometimes feels a bit overwhelming. It's getting better, though. Anyway, I decided to walk over to Chez Lulu for something light.

I ended up ordering penne alla vodka. It rocked. I was very pleased. Good sauce. Pleasantly spicy. It was everything I'd hoped for and the dish helped me figure out how I gage restaurants: if I can make it better than the restaurant, it wasn't worth it. When I finished my pasta, I decided that it was at least as good as something I could have put together.

And then I got the bill. Sixteen dollars for a smallish plate of pasta without any meat. I was not happy. Right, and they don't take American Express. Ugh.

On the walk home, I decided to make the pasta for myself. The next day I found Lidia Bastianich's recipe, gathered the ingredients, and rocked it out. I cannot remember a dish I've prepared that tasted so good, came together so quickly with so few ingredients. I ended up using a can of crushed San Marzano tomatoes (instead of whole) and didn't puree them (because I still don't have a food processor larger than 1/2 cup). And since Lidia didn't give any kind of direction with the red pepper flakes, I used three large pinches (which I estimate at around 1 1/2 tablespoons). The result was at least as good as Chez Lulu's, a pleasant spice level (though next time I may put a little more), and, as you'll see in a moment, incredibly cheap.

It wasn't much more than 35 mintues from boiling the water to sitting down at the table. So worth it.

Final cost per portion - $2.05 per serving.

September 9, 2007

Somewhere between good cooking and cookbooks...

It’s been a while since I’ve posted, and I know that most of you out there in internet-land don’t notice when a fresh face arrives on the Gourmetro, but I think I’ve developed a sort of calling card around here, and I think it’s time for me to write a preface. The stuff I’ve blogged about has three things in common: it’s easy, it’s cheap, and it’s unhealthy. What I am about to go into here is neither easy, nor cheap. However, it is entertaining. And unhealthy. Fabulously unhealthy. Enjoy.

Elizabeth and I recently passed our two year anniversary, and I got exactly what I wanted. Cookbooks! Three of them, to be exact. She had me pick them out. One is interesting, but a little bit useless. One is possibly the greatest cookbook that you could own. Marcella Hazan’s Esentials of Classic Italian Cooking which YOU SHOULD HAVE ON YOUR SHELVES!! I already yelled at Skip once for not knowing who Marcella Hazan was and I’m reminding him again: Marcella is awesome. Seriously. But that’s not what I want to talk about today. What I want to talk about is Yamuna Devi’s The Art of Indian Vegetarian Cooking.

Anyone who knows me knows that I am nuts about Indian food, especially Indian appetizers. I have long dreamed to be a master of Indian cookery, and I think it’s going to be a long while before I am. I made Samosas once before while I was staying with with my buddy Burfy in Houston and we had a blast making them. This time, however, it was just me and Devi.

I should mention that I am not a cookbook aficionado. I tend to use the web for my recipes. However, I thought it was time to expand my repertoire, and this was certainly an expansion. I mention that because I have to say something about this cookbook. The biggest problem with my experience making samosas was Devi herself. She’s terribly unorganized and seems to write as though you should already know everything you need to know to make whatever dish she’s bringing you through. I’ll explain as we go.

Before we get started with the actual cooking ingredients, let me say that there are a few things you’ll need for this cooking which you might not have. A wok or karai is one. A karai is an Indian sort of pan which is kind of like a semi sphere. It’s very deep, and you need a deep frying pan for samosas. I don’t have a karai. Woks are much easier to find and I would recommend one. You also need patience. A lot of patience. Devi thinks that you should be able to get the samosas prepared in an hour, but since I work and only have a couple of hours a night, it actually took me several days to get my samosas made. You’ll also need to make a trip to a health food store or Whole Foods to get spices.

Now then, two recipes here. First is Devi’s, and second is how I faked it.
1 ½ cups unbleached white flour
¼ cup farina
½ teaspoon salt
4 tablespoons mint-lime butter or unsalted butter, softened
6 to 7 tablespoons ice water

Just to cut in for a second. I should mention, because Devi didn’t, that these are the ingredients for the crust of the samosas. I mention that because she mentions salt again in the coming ingredients, and I didn’t notice, so I used the wrong portion of salt in the crust. Like I said, she explains really badly. Anyway….

1 ½ teaspoons black mustard seeds
2 tablespoons mint-lime butter, ghee, or unsalted butter
2-3 hot green chilis, seeded and minced
½-inch ginger root, scrapped, finely minced and shredded
¼ teaspoon yellow asafetida powder
6 medium sized potatoes, boiled, diced, peeled, and cut into ¼ inch dice
1 ¼ teaspoons of garam masala or chat masala
2 teaspoons salt (SEE! RIGHT THERE!!)
1 teaspoon raw sugar
2 tablespoons chopped fresh coriander or lemon basil
flour for dusting
ghee or vegetable oil for deep frying.

So! Lots of stuff. I used too much potatoes. Also, I wound up putting the two teaspoons salt into the dough instead of the potatoes. Besides that, I couldn’t find fresh coriander, so I used powdered. Couldn’t find black mustard seed so I used yellow. Also, I had no luck finding yellow asafetida powder (also known as “hing”), I skipped the sugar, and I added in about a half jar of this Madras red curry sauce I found at Whole Foods.

The dough itself is pretty easy to make. Basically, you combine the flour, farina (I used Cream of Wheat which worked just fine) salt and butter in a mixing bowl. A note here. Mint-Lime butter is easy to make if you have a food processor. You put in your butter, some fresh mint leaves, about half a lime and just process the crap out of it. If you don’t have a food processor, that’s fine. Use regular butter, the results will be about the same. Mix up the dry ingredients and the butter by hand, and keep on just working it all together until it’s sort of like heavy bread crumbs. Then, just start adding ice water, mixing up the ingredients, and adding ice water again until it gets to be a nice hard dough. Kneed it for a few minutes, and then form into a ball, rub some oil into it, and cover it up. Keep it in a dry place until you’re ready to actually make the samosas. If you’re like me and it’s going to take you some time to actually get the samosas made, cover it up tightly and put it in the fridge or freezer. You’ll have to wait until it’s near room temperature before using it again, but it stays fine for a couple days.

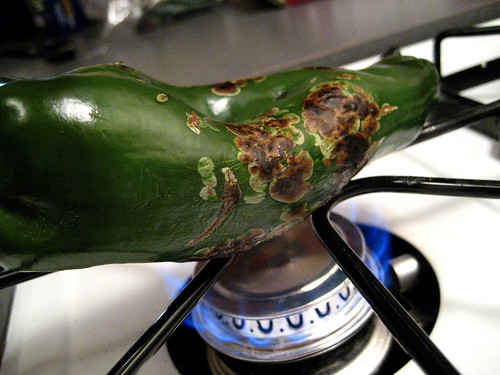
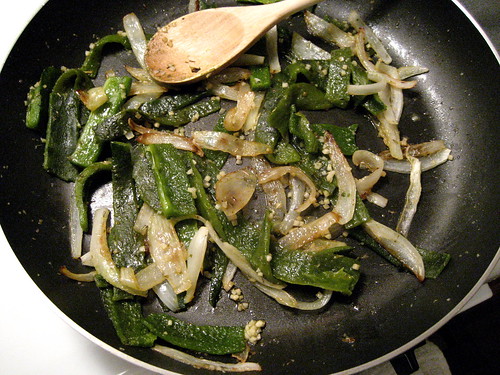
For the filling, start out by heating up the mustard seeds until they are “jumping in the pan”. At least, that’s what Devi says. Really, you should start by getting your potatoes ready. See, Devi thinks that just because she lists it in the ingredients, that means she doesn’t have to remind you in the actual “this is how you cook this” to boil, peel, and chop up the potatoes. That’s something that bugged me about her. She cuts corners and it’s annoying. Her not cutting corners and perhaps mentioning the portion of salt you use in your crust instead of just saying, “add the salt” could also have saved me from my previous mistake. But she didn’t. Anyway, once your potatoes are boiled, peeled and chopped, put your mustard seed into a nice big frying pan and heat them until they start to jump. At that point, add in the green chili peppers, the ginger, the asafeita and the butter or ghee.

STOP! Do NOT use ghee! It is one of the most vile substances you will ever encounter. I’m sorry if you’re Indian and you’re offended and maybe this is just a New York Jew whose pallet is not sophisticated enough to understand, but ghee is the most disgusting thing in the universe. You say to yourself, “This is authentic, it must be good.” But it’s not. It smells awful from the moment it touches the frying pan and still smells while you’re trying desperately to get it out of the pan seconds later. The smell stayed in my kitchen for a full day and a half afterwards. I washed my hands like fifteen times because I could still smell the ghee on them. I can’t describe to you why ghee is so vile, I can only tell you that it’s gross. Use butter, use oil, use any fucking thing that isn’t god damn ghee.

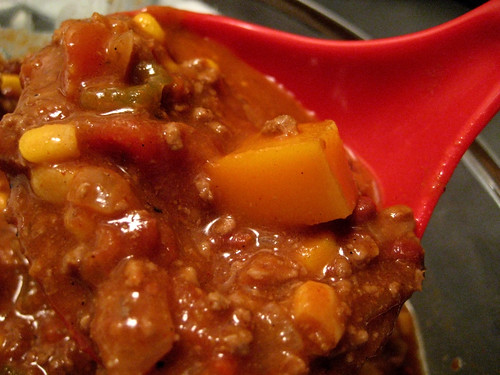
Anyway, after you’ve scraped your pan free of ghee, started again and put in something rational instead, keep on cooking the mustard seeds, chili, and asafeita until the mustard seeds change color. This shouldn’t take that long, and if it seems like nothing’s changing after a minute or so, just go on to the next step. Add in the potatoes, the garam or chat masala, the salt, and the sugar. Stir fry it all for a couple minutes. It was also at this point that I added my half jar of Madras. I wasn’t originally going to use it, but without the asafeita it seemed a bit to bland and at this point, I had realized my mistake with the salt and was desperately trying to fix it. I blame Devi’s written organization skills.

Once the filling is cooked up, take it off the heat, put it to the side, and let it cool to room temperature. It was at this point that I stopped the first night. You can too. It’s fine. Wrap the potatoes and put them in the fridge if this has taken you too long. If you’re like me, the next part will take way longer than it should.

Get out a nice straight bladed knife, a rolling pin, and some flour. You’ll also want to have a bowl in front of you filled with water. Take your dough that you had previously wrapped up and roll it out into a rope about 14 inches long. Cut the dough into fourteen equal sized pieces and cover them all up with a damp paper towel or cloth. Devi suggests that you also break your potatoes into 28 equal sized pieces. It’s a decent idea, but it winds up taking a while and it isn’t really necessary. Dust your work surface with flour. This next step you’re going to do with every single one of your fourteen pieces of dough. Hopefully the dough’s a little wet, but if it isn’t, that’s ok. I wound up actually dipping every piece of dough into my bowl of water and working the water into it until it was a little sticky before working with it. Roll your piece of dough into a nice ball. After that, mash it into a little patty on the dusted work space. Then, you take your rolling pin and as well as you’re able, flatten and flatten your dough until it’s a circle, maybe six inches across. This next part's confusing, so I’ll type as slowly as possible.

Cut your circle in half. This is the dough for TWO samosas, so when you’re working with the first of your two new semi-circles of dough, don’t worry about the other half. Wet the straight line you just cut across the dough so you can turn it all into one cone of dough. You want to fold the dough in half, connecting the straight edge to itself. Make sure that the dough is smoothly connected. You want as few holes as possible in the dough. If you’re able to get through that mess of grammar, fill the cone about two thirds or maybe a touch more with potato mixture. After that, connect the wind end of the cone together using moisture, pressure, and smoothing. Put your uncooked samosa to the side.

When you’ve done that with all your potential samosas (there should be 28 of them) fill your wok at least an inch high with vegetable oil or, for the sense masochists out there, ghee, and put it at about a medium high heat. For me, it took an entire 32 oz bottle of Crisco Vegetable oil. Like I said at the top. Not cheap. I mean, it only cost like 4 bucks for the bottle, but for god sakes, I needed the entire bottle!

When the oil gets hot, just fill it up with samosas. You’ll want to turn them maybe once, but just keep them in there until they turn a nice brownish color. Then, you’ll want to drain them for a bit on paper towels. Depending on how well you combined the pieces of dough, they’ll need more or less draining.

The samosas turned out pretty well for me. They’re super greasy, just like they ought to be. The salt balance is off, but I’ve already explained that. Actually, I do think that you need more than just the half teaspoon of salt in the dough, but I think one would have been fine. Actually, they came out a little bland, but I have high hopes that with a nice tomatilla sauce on the side (I’m making one for the first time tomorrow, I’ll blog about it and how it works with the samosas later) it could make a really nice little meal.

So, what did I get out of this experience? First off, I don’t think that Devi’s cookbook is all bad, because I actually do like the samosas. I don’t think I’ll do her next recipe so haphazardly, I’ll need to write down every step for myself and see if it all makes sense first and maybe reorder what there is to do, but maybe I should learn to do that anyway. It’d certainly save me time if I want to blog about it later. But I think we should remember that cookbooks are put together, on the whole, by chefs and not by writers, and chefs may not know shit about structuring a piece of writing.

If you need a chef who’s also a writer, a friend of mine from school named Adam Roberts has just put out a book from his own food site, The Amateur Gourmet. Adam’s a good guy and I’ve used a couple of his recipes myself. But I think the biggest lesson is one that I’m only starting to learn now. If you want to experiment with Indian cooking, say goodbye to ghee, and hello to Pepto. I’m in for pink, but my left over samosas just tell me to buy more bottles.

September 6, 2007

Cold reboot (and how)

I can hardly believe it's been over a month since my last post. It hasn't been for lack of eating. I've done some of the best eating in my life, let me tell you. Babbo is an ultimate gustatory experience. Eat at Babbo. If you have to wait for three hours, it's still worth it. Nothing has tasted the same since. No joke.

But this post isn't about Babbo. I know you'd all like to hear about the sardines with lobster reduction oil, linguine with clams, the roasted octopus salad, the beef cheek ravioli with crushed squab liver, or the saffron panna cotta (but not the rabbit), but that's not what I'm here to talk about today.

That's because I'm no longer in New York City. And while Birmingham, Alabama does have its culinary high points, Babbo's not in the cards. My Gourmetro writing is returning to my nearly counterless kitchen. It's for the best. Y'all have lots of people writing about New York restaurants anyway.

So, last night was the first time I'd cooked for myself since I left Apple Fifth Avenue (August 8). I was really busy packing, saying goodbye, driving 1200 miles, unpacking and beginning a new life for myself in the Deep South. It's been an interesting transition.

Since I arrived here on the 22nd I'd felt no desire to cook for myself. In the beginning it was natural, since all of my supplies were either in boxes or still in-transit, but it didn't abate as I settled down. It worked out, in a way, since I got to [heavily] patronize the local establishments and learn about the neighborhood, but I knew that I couldn't make such a habit of eating out. And why would I want to? After one and a half years of Gourmetro, I am confident that I can make very decent food at a fraction of the restaurant prices.

For the occasion, I gave my new Cooking Light All-New Complete cookbook a try with their curried chicken salad and vegetable couscous. It's really hot down here (92 degrees at night), so I opted for the Whole Foods rotisserie chicken. It was a good choice, I think, because one 3-pound bird was enough to double the recipe (to about four servings, as far as I can tell).

When I finally sat down to eat the salad, I was let down. And a bit pissed. In my three or four years of cooking, I can think of only a few times when I'd been completely dissatisfied with something I'd prepared (the $80 scallop dinner for two is still probably the most disappointing). Bland, sticky and sweet.

In addition to the chicken, the recipe calls for pineapple, grapes, apples, and currents. The grapes completely overpowered everything else and I could hardly detect any curry. Lame. I'd omit the grapes next time, and up the curry. Hell, I might double the curry. And the currents -- a good idea -- were much too chewy. Not so distracting that I'd leave them out, though.

As a postscript, I had the chicken salad again today for lunch as a wrap with lettuce. It was much, much better. The grapeyness was mellowed out by the lettuce/radicchio and the whole wheat wrap. Perhaps the salad belongs in a wrap.

The couscous salad was another story. Really excellent. It came together quickly, seems healthful, and tasted quite good. The one real issue I had with the recipe was that it called for a packet of 'Italian Dressing Mix,' and that, I couldn't abide. I converted the .6 ounce package details to 3.6 teaspoons (which I upped to 4) of dried basil, oregano, rosemary, and parsley. It worked out quite well, I think. (and when am I ever going to use up those dried parsley flakes...) The end result was moist and just tender enough, though next time I may bring the boiling water down from 1 1/2 cups to 1 1/4 (as it recommends on the box).

We'll see how the couscous fares tomorrow at lunch, but I expect it'll only get better.

**pre-post update**
So as I wrote this post, I hadn't realized that I'd forgotten to add the feta. So I added it, and today at lunch I was quite disappointed to discover that it made the salad worse. Yes, adding cheese made the couscous worse. It's bizarre. Try it without the feta first.

June 3, 2007

Cheap & Tasty: Tortilla Espanola


If you've been to any of the trendy tapas places around DC - or any other urban area - you've probably seen Tortilla Espanola on the menu. It's very simple dish, basically a Spanish omelet/quiche hybrid. Cooking it is a breeze and leaves your house smelling of hash browns for a day afterward, which is a major bonus. Plus, it's SUPER cheap and is a classy way to make the those last few days before the paycheck go faster.

And though cheap and tasty, still swanky: Mario Batali made a Tortilla Espanola as part of his tapas plate in Iron Chef America's "Battle Garlic." So garnish with pride and pretend you're at Babbo.

I referenced recipes from the Washington Post and Epicurious in making this, but here's my version:

Tortilla Espanola

Approx. 8 eggs, beaten
6 cups peeled and diced (1/2 in.) potatoes
2 medium diced yellow onions
salt & pepper to taste

lots of olive oil

Heat about 1/2 cup of the olive in a 10 inch nonstick skillet (if your pan is slightly larger or smaller, it's fine) over medium high heat. Once oil is hot, add half of the chopped onion & potato mixture. Cover and cook over medium heat until mixture is browned but not mushy; stir periodically to keep it from burning. Dump the cooked potato & onion mixture into a large bowl to cool; add more olive oil to the skillet and cook the rest of the batch in the same manner. (Note - you can cook them all at once, it's just a LOT easier and less messy this way. Unless you have a gargantuan skillet pan, in which case, go for it!)

Add the second batch of cooked roots to the first and let cool. Add the beaten eggs, salt, and pepper and thoroughly coat the potatoes. If you feel the need, add more beaten eggs. I wouldn't go above the Epicurious' suggestion of 10, but you're definitely going to need at least 6.

Back to your skillet - add 1/4 cup of olive oil and heat it up to medium. Pour all of the eggy mixture into the pan and smooth out the top with a spatula. Keep heat low-ish to prevent burning - from experience, it will still taste good, but the tortilla is much less pretty when it's black. Cook for about 10 minutes, occasionally running a spatula along the rim of the skillet to loosen the tortilla.

Now comes the fun part - when you can feel the tortilla slide around a bit on the skillet, ensuring its doneness, get out a big plate. Invert the plate on top of the skillet and flip the tortilla onto the plate. Slide the not-as-cooked side of the tortilla back into the skillet and cook for about another 5 minutes, until the tortilla is solid. You're done!

For serving, there really is no "right" side up. The skillet side is usually rounder and prettier, but the non-skillet side give a better view of the potatoes and other tortilla innards.

Some other notes:

You must use a nonstick pan. I tried cooking some of the potato/onion mixture in an iron skillet and it was much messier. Had I attempted to add the eggs, the tortilla would not have stayed intact.

Do not be afraid of the salt! I grew up in a salt-fearing household, so I am conditioned to undersalt, but go ahead and pour it on (the pepper too, and any other spices you deem worthy) to make sure you're getting the most flavor out of your potatoes.

Oh, and if you're feeling decadent, add some bacon to the mix and make your kitchen smell even better. Just cut back on the olive oil a bit.

Technorati Tags: , , ,

March 5, 2007

16 oz Queso Fresco, 8 Meals

Sometimes I talk myself out of buying exotic ingredients. Whether they're expensive (meyer lemons), difficult to locate (farro), or just plain scary (uni), I can come up with many reasons to avoid a potentially awesome dish.

I had talked myself out of making macaroni with cream and cheese, Gourmet Feb. 05, for some of the above reasons. It had a number of red-button items in the ingredient list; it called for over 1 pound of chili peppers (I'm scared of spicy things, though I do often like them), and two types of Mexican cheeses: queso fresco (a firm, crumbly cow's milk cheese, similar to a mild feta), and crema (like creme fraiche, but more viscous).

While the recipe was not on the top of my list for those reasons, I happened upon all of the ingredients in my trusty SpaHa Associated. After buying some, I realized I had forgotten the serrano chiles but decided the poblanos would be spicy enough. (I was right, though I've heard the serranos are not quite as aggressive as they could be)

The recipe was incredible, the balance between the chile heat and the mild, creamy cheese made it totally worth it. Roasting the chiles was another first experience for me; I probably could have charred the outsides a bit more, but I was afraid I'd overcook them. The chiles came out tender and gave the dish a significant cumulative spiciness, but nothing unbearable.

At the end of the meal I was left with 3/4 of the queso fresco wheel. For a day or so I considered remaking the macaroni, but then the Feb. 07 Gourmet came. And with it, another intriguing recipe containing about a half-pound of queso fresco: an Andean potato stew. The editors billed it as comfort food, and considering the extreme cold it sounded ideal.

The achiote seeds seemed like they'd be difficult, but I found them, surprise surprise, at the same supermarket in the spice section. And the bottle was about 25x larger than I needed, so I'll be set with achiote for a while. Let me know if any of y'all need to, say, color some American cheese or dye some textiles (other popular uses include Mayan warpaint)

Preparation was easy and the product was satisfying. I'd say I increased the total poundage of potatoes to about 5; with the original 3 1/2, the potato stew was somewhat paltry on the potatoes (though I may have stretched it into more meals than the recipe foresaw ...). For clarity, the additional potatoes were cubed, not mashed. The queso fresco muted the mild achiote heat and looked quite handsome topping the stew. The avocados were crucial.

All of that left me 4 oz queso. I ate 2 oz standing over the range waiting for the potatoes to boil, and sliced the rest and topped it with red wine vinegar (kind of gross; balsamic would have been better).

One wheel of queso fresco, 8 meals. (It might have been 10...)


Technorati Tags: , , ,

January 29, 2007

Cheap/Tasty - Butternut Squash Chili

In winter's depths last week, I thought it high time to try out some chili. I went to the usual suspects, epicurious, Southern Living, Cook's, etc., and found only two recipes that looked promising: a beef-and-butternut squash chili from Southern Living and a traditional chili con carne from Gourmet. Feeling adventurous, I went with the former.

Honestly I don't think I've ever prepared a recipe that called for so many canned goods, and considering I made a double batch, my poor decrepit can opener had to grind through (yes, grind) seven cans of tomatoes, 'chili with vegetarian,' and broth. The thought of the creamy, dreamy butternut squash got me through the miserable sound of my dying can opener.

The recipe was incredibly straightforward to prepare, but I ran into problems in the supermarket finding the ingredients. After going through three or four markets looking for canned 'chili beans,' I eventually settled on Hormel chili with vegetarian beans. Afterward, my roommate put forth the suggestion of canned kidney beans, but by then I had decided to go with my gut.

And I was rewarded. Except for an unfortunate blandness, which was remedied by last minute adjustments, the chili rocked. The sweetness of the squash played beautifully with the spices and the texture proved a compliment to the mix.

It was versatile, too. I served it alone, topped with cheese and sour cream. My favorite, though, was mixing it up with rice. Hearty and filling. And, according to Southern Living, the chili is full of vitamins B, C, as well as zinc and beta-carotene. (!)


Technorati Tags: , , ,
Special thanks to me for the photo. It isn't pretty, but it's good stuff.

November 9, 2006

Say it with me: "Role-lah-din"

Tonight Liz made rouladen (not to be confused with rolladen). Rouladen, for the uninitiated, is (are) a german delicacy in which one wraps up slices of pickle and onion with a thin piece of tender beef. It's then sauteed in stock and savored with, in our case, mashed potatoes.

I will admit that it doesn't sound appetizing. Pickles, mustard, onions, and beef sitting on an island of mashed potatoes, surrounded by a sea of broth, doesn't even make me want to eat it, but trust me. It's damn good, easy to make, and really quite inexpensive.

I had to leave for work before I could get a recipe out of my roommate, but the basic ingredients are the thinly sliced (1/2-inch thick) beef [tenderloins?], dijon mustard, liberally applied to raw beef, paprika (very liberally applied; I'm talking Ralph Nader liberal), dill pickle slices, white onion, cut into 1-inch wedges, flour for dredging, and some vegetable oil for browning. After you assemble, in above order, you roll the little buggers up, fasten with 3 toothpicks, and then boil the hell out of them in 3 or 4 cups of stock. There is no time limit on the boiling. The longer the better (so she says).

Serve the slug-looking things on a bed of something unhealthy and you're set.

They taste good, but they look like sauteed slugs. Just eat, don't look. I'll get more details eventually.

Technorati Tags: , , ,
Yes, the picture is mine. In its grainy glory.

November 7, 2006

Fear of baking

After yesterday afternoon's unsettling discovery, I set out to try some new recipes. With a meal consisting of Cook's Illustrated penne alla vodka and Southern Living's Apple/Cranberry pie, I won't admit it isn't just a little strange, but whatever. It's fall. Fall means apples, and apples go with pretty much anything. And one last thing before I start: today's moral is: follow the recipe, it's there for a reason.

Instead of scarfing down my freshly-made food like I do practically every monday (since I never seem to allot enough time for preparation, eating, and cleanup), I started quite early tonight (though that extra time was eaten, as it was, by the pie's cooling time). At any rate, it was a good first step to getting better.

Like some Cook's recipes, the penne was incredibly easy (like the coq au vin) and quick to prepare (unlike the coq au vin). Most of the ingredients were gathered at the 14th St. Trader Joe's, where I accidentally bought whole, peeled tomatoes with basil. When I got home and realized what I'd done, I decided the extra basil couldn't be a detriment. It was fun using liz's little chopper/grinder to 'puree' half of the tomatoes while I diced the rest (until I realized that the pureeing peeled whole plum tomatoes were splattering in a fine spray around the kitchen; still fun, but in a gross kind of way).

Everything else about the penne was straightforward, except my getting flustered and sprinkling the red pepper flakes instead of measuring them. I really wish I knew how much I used because it wasn't nearly enough, so the outcome was solid in the viscosity department, but sadly lacking any kind of heat. More onion seems wrong, but a bit more garlic may have been welcome.

Overall, totally worth it. I'll be making this penne again. (with added heat)

And onto the Apple-Cranberry pie. I've never really been excited enough about a pie on paper to want to cook it, but the damn-easy instructions in this month's Southern Living encouraged me to beat the fear of baking and I went down to the Union Square Farmer's Market to get some fresh locals (um, apples, of course), and only then remembered that it was Monday. Monday is the market's off day and usually disappointing, and instead of getting the suggested Gala, Macintosh, and Granny Smith apples, because the latter two weren't available, I ended up with Gala, Braeburn, and Romes.

My awesome roommate peeled the apples, about 9 of them (the recipe called for 12, but the growing pile began looking ridiculous). Some lemon juice, some flour, and 1 1/2 cups sugar (damn). They did reduce, but it was still quite overflowing when we got it into the shell. The shell, btw, was a bit annoying to work with; I chose a Pilsbury 2x9-inch refrigerated pie crust and it did not unroll well.

As the apples reduced I could see what would eventually become the pie's ultimate problem: soupy apples. The Romes (I'm pretty sure it was them) began gooeifying during the saute phase and continued on their slippery slope until they turned into a (delicious, but) soupy mess during the baking phase.

We decided against the lattice, as you can see (above), and I think the steam vents suited it fine. We also didn't cover the crust in tin foil, as suggested, to prevent over-browning; thankfully it wasn't an issue.

And the result: Braeburn apples rock for pie. Rome apples do not. Pilsbury crusts suck before their cooked, but once they are they're quite decent. And Southern Living can make a great pie.

Next time I might add some grated orange peel and cinnamon/nutmeg/allspice. This was Liz and my first pie, and it was a good, solid start. Oh, and to be a food nerd for a moment, Cook's Illustrated said that precooking the apples helps them keep their shape BUT you have to make sure the heat doesn't go past 140 degrees. They recommend using a Dutch Oven instead of a saute pan. If I'd read that before making the pie, things may have turned out better. Maybe.


Technorati Tags: , , ,
Extra special thanks to me for taking this photo. I should really take more photos.

October 24, 2006

Je t'aime, Coq au Vin

Go and buy the Nov/Dec issue of Cook's Illustrated. Go now. It food gold. Food gold.

Aand dear readers, the following post breaks practically all of our standards; if you're looking a fast, inexpensive meal, you should look here or here (or here), because this certainly isn't one of them.

When I saw the coq au vin recipe I knew I had to do it. "Fast" the editors suggested, "easy". It was neither, but oh my God it was amazing; perhaps the best dish I've ever made. One of the top five for sure.

After a rough start foraging at the Pathmark (no frozen pearl onions, only ones frozen with a sherry cream sauce, hardly any skinless/boneless chicken thighs, and, not surprisingly no cremini mushrooms [actually, I ended up with baby 'bella mushrooms, which are another name for creminis. The things you learn on wikipedia- skp]), I got some editing done and started cooking at about 5:30.

At about 8:45 I started to get nervous. They said this was going to be easy. And fast (90 minutes). Boiling down the wine, cutting up the chicken, and mushrooms, browning both, making lardons, browning them, peeling and cutting up the vegetables for my root vegetable puree, boiling them, boiling down the wine more should not have taken so much time. It did.

And after it was all over I did get to spend about minutes enjoying it. The sauce was incredible; a whole bottle of pinot noir, some butter, garlic and mushrooms. Damn. The chicken thighs were juicy and tender.

Oh, and the aforementioned mashed root vegetables:

6 medium yukon gold potatoes cut into 2-in cubes
1 lb carrots, cut into 2-in cubes
1 lb parsnips, cut into 2-in cubes
1/2 cup whole milk
1/2 cup chicken stock
4 tablespoons (or 1/2 stick) butter
Kosher salt and black pepper to taste

Boil potatoes, carrots, and parsnips until tender in salted water. Drain. Mash viciously (in boiling pot). Add milk, stock, and butter. Mash on. Feel free to add more milk or stock to your taste.

And while you're at it, grab the October and November Gourmet issues. Lots of great recipes in Quick Kitchen and the other sections near it. I served the coq au vin and roots with some roasted acorn squash with chile vinaigrette from the Oct. issue.


Technorati Tags: , , ,
Special thanks to ginandtonic1978 over at flickr for the coq au vin picture and epicurious for the squash.

October 3, 2006

Baked Ziti Redux

This one'll be short but there will be more this week. I swear. Working 60-plus hours a week will not stop this gourmetro. (mono might, but we'll cross that bridge when we're forced onto it)

Last week I made one of my favorite fall/winter meals, baked ziti. It's near and dear to my heart and I tore it up when I made it last week. Oh, and tearing it up is like ripping it apart. It's a good thing, I think.

When I decided to eat ziti for the week I had a momentary epiphany: why am I adding 3/4 cup of water when I could be adding 3/4 cup of wine? That's it. Red wine made that kickin' ziti even better. I used a Cabernet Franc, but any full-bodied red should do. If you're a purist, use an Italian red like Chiante or Barolo.

My other alteration was that I shredded my own block of mozzarella. It made a big difference, much more stringy and moist than the pre-shredded stuff. And I used Polly-O, so nice, fresh mozz would be even dreamier.

Oh, that and a pound and a half of mild sage sausage (most of the fat reserved ;) ).


Technorati Tags: , , ,
Special thanks to viamarisol over at flickr for the extreme close-up.

September 13, 2006

Hungry, stressed.

It's been a while, I know. I've been in the midst of moving for the last month, and now that I finally have moved to my amazing new SpaHa residence, all of my jobs have started to give me all the hours I've wanted at once. And now my diet, and the Gourmetro, suffers. Does it ever.

For the last week, my intake has consisted of kickin' Peanut Butter & Jelly Co. White Chocolate (and Cinnamon Raisin Swirl) peanut butter with Whole Foods 7-Grain bread (which sucks), expired Barilla tortellini, and Patsy's tomato and basil sauce. And lots of bad Chinese food. How could I forget. I'm not starving by any means, but I'm looking forward to having all of my cooking tools back (which should happen this Sunday)

This morning I decided to break my good food fast by hitting up the Union Square Farmer's Market, and with only $15 in my pocket, I knew I would have to work to get everything I needed without getting distracted by the colorful tomatoes.

A few pats of butter, salt and pepper, and some olive oil turned a pound of organic fingerling potatoes, crisp lemony French Sorrel, a bone-in wing of Skate, some yellow pear-shaped grape tomatoes, and a bag of summer squash into a pretty sweet dinner. The potatoes broiled until fork tender while I sauteed the skate and the then-sliced summer squash. From beginning to end it took about 45 minutes and tasted great. I wish I'd had some of my spices, but they're still on Long Island with the rest of my stuff. Salt, pepper and lemon were the only seasonings I had to work with, and they worked quite well.

It was nice to eat something real. Oh, and I sauteed the just-shy-of-a-pound skate (after rinsing and rubbing down with olive oil and salt and pepper) over medium-high heat for about six minutes. It probably could have used one or two more.

I'll have to learn how to debone the skate, because while the cartilage wasn't too off-putting, it would be better removed.

Technorati Tags: , , ,